Complete guide
Sourdough Bread: The Complete Guide
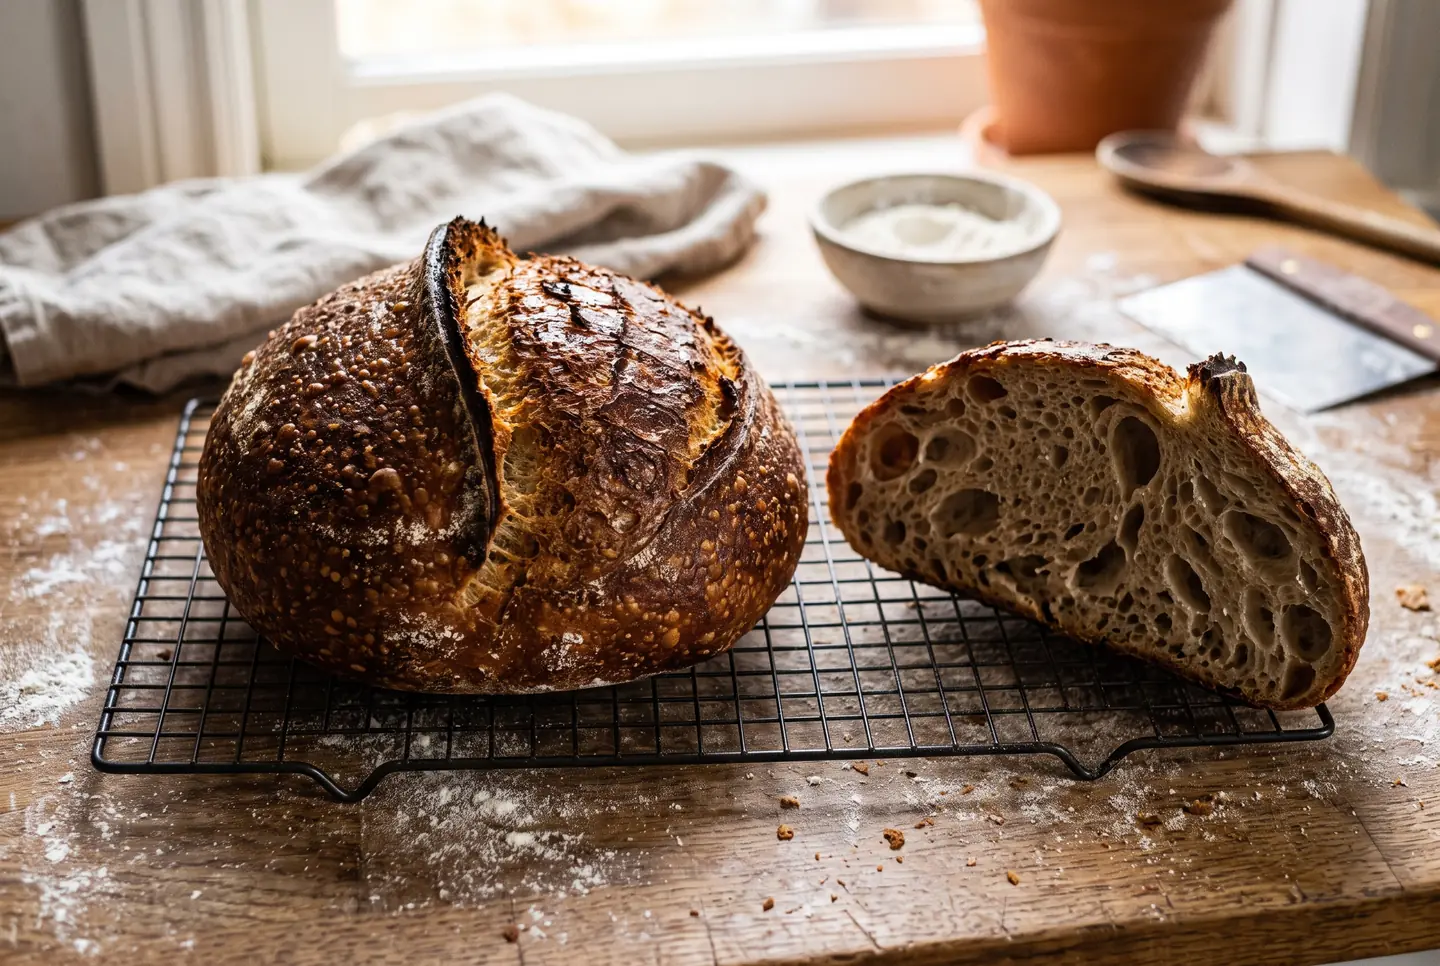
A loaf of sourdough is flour, water and salt, leavened by a jar of wild yeast instead of a packet, and yet it is the bread people find hardest to make well at home. The reason is not the ingredient list, which never changes, but the fact that almost every step is a judgement call rather than a fixed time. The dough is ready when it looks ready, the loaf is proofed when it feels proofed, and a recipe that gives you only minutes and grams has left out the part that actually decides whether you get a tall, open, chestnut-crusted boule or a dense, gummy disc.
This guide is built around the decisions that make the difference, in the order you meet them. The first is hydration, how much water goes into the flour, because that single number sets how the dough handles, how open the crumb comes out, and how much skill the loaf demands of you. The second is bulk fermentation, the long first rise where the dough gains its strength and its flavour, and where most home loaves are lost to over or under proofing. The third is everything that happens once the dough is shaped: the cold night in the fridge, the single confident cut, and the covered pot that traps steam and gives the crust its spring.
Get those right and the variations, whole grain, gluten free, the sandwich crumb, are adjustments to a process you already control. This all assumes you have a starter that is alive and rising; if you do not yet, build one first with the complete guide to making and keeping a sourdough starter, then come back here to turn it into bread.
The base formula in baker's percentages
Every sourdough recipe worth trusting is written in baker's percentages, where the flour is always 100 percent and everything else is a share of the flour weight. It looks like extra arithmetic and it is the opposite: once you think this way you can scale one loaf to three, or swap a recipe's flour for yours, without redoing the maths, and you can read any two recipes side by side because they are speaking the same units. A dependable all-rounder loaf sits close to the widely used beginner formula from The Perfect Loaf, which runs 72 percent hydration with a small dose of starter and a long, slow fermentation.
| Ingredient | Baker's % | Example weight |
|---|---|---|
| Bread flour (with a little whole wheat and rye) | 100% | 500 g |
| Water | 72% | 360 g |
| Active starter | 18% | 90 g |
| Salt | 2% | 10 g |
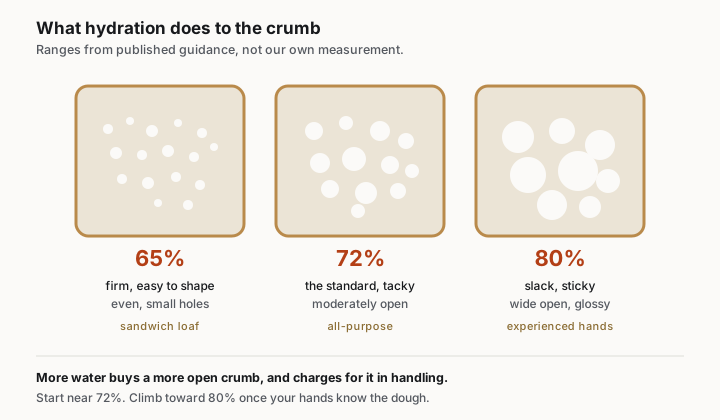
The one number that changes the bread more than any other is the water. The same flour, the same starter and the same schedule will give you three genuinely different loaves at 65, 72 and 80 percent hydration, and the trade is always the same: more water buys a more open, glassy crumb and charges for it in how hard the dough is to handle. This is the fork in the road every sourdough baker stands at, and it is worth seeing laid out before you pick.
| Hydration | Handling | Crumb | Who it suits |
|---|---|---|---|
| 65% | Firm, easy to shape, holds its form | Even, smaller holes, slices clean | Beginners, sandwich loaves |
| 72% | The standard, slightly tacky but manageable | Moderately open, all-purpose | Almost everyone, most of the time |
| 80% | Slack, sticky, needs confident gentle hands | Wide open, glossy, see-through walls | Experienced hands chasing an open crumb |
At 65 percent the loaf is firm and predictable and slices beautifully into sandwich bread; at 80 percent the crumb is so open you can nearly see through some of the holes, but the dough is slack and shaping it takes confident, gentle movements (flourwise). If you are early in your sourdough life, start at 70 to 72 percent: it is forgiving enough to teach you what a good dough feels like and open enough to be worth eating, and you can climb toward 80 percent once your hands know the dough. The full base recipe in weights you can scale sets out the timings for each of these hydrations.
Choosing the right flour
Flour is the second dial, and it matters more than beginners hope. Sourdough wants a flour with enough protein to build a strong gluten network, because that network is what holds all the gas the wild yeast makes and lets the loaf rise tall instead of spreading flat. A good bread flour, generally around 12 to 13 percent protein, is the backbone of almost every reliable loaf; a soft all-purpose flour can work at lower hydration but tends to go slack and tear when you push the water up.
The other half of the answer is what you blend into that bread flour. A small proportion of whole wheat or rye, often 10 to 20 percent, does a lot of work: it feeds the fermentation with more minerals and enzymes, deepens the flavour, and speeds the rise, which is why so many beginner formulas fold a little of each into an otherwise white loaf. The trade is that wholegrain flours drink more water and ferment faster, so a loaf heavy in them needs a wetter dough and a closer eye. The guide to picking the right flour for sourdough covers protein levels, the wholegrain blends and how each one changes the water you need.
Bulk fermentation: read the dough, not the clock
Bulk fermentation is the long first rise, from the moment the dough is mixed until it is divided and shaped, and it is where a sourdough loaf is won or lost. This is the stretch where the wild yeast inflates the dough and the gluten sets into a structure that can hold that gas, and getting it right is almost entirely a matter of reading the dough rather than watching the clock. A published time is only a starting point: The Perfect Loaf's beginner loaf runs a bulk of about 4 hours at 74 to 76 F (23 to 24 C), but that same dough in a cold kitchen might need six or seven, and in a hot one it can be done in three.
Temperature is the reason the clock lies. Fermentation speeds up sharply as the dough warms and slows just as sharply as it cools, so the single most useful thing you can do is know how warm your dough actually is, not your room. Look instead for the signs: the dough grows by something like a half to three quarters in volume, domes at the surface, shows bubbles at the edges of the container, and feels alive and jiggly rather than dense. Under-ferment and the loaf bakes tight and heavy; over-ferment and it slackens, loses its strength and bakes flat and gummy. The full guide to judging bulk fermentation by feel walks through the visual and tactile cues at each stage.
The folds: stretch and fold, coil fold, slap and fold
You do not knead a sourdough loaf. Instead you build its strength in a series of gentle folds spread through the first part of bulk fermentation, which develops the gluten without the punishing work of kneading a wet dough on a counter. The beginner rhythm is simple: three sets of stretch and folds during bulk, spaced about 30 minutes apart (The Perfect Loaf). Each set takes under a minute, and between them the dough rests and relaxes.
The folds are not all the same, and the one you reach for depends on how wet the dough is. A stretch and fold, done in the bowl, suits most doughs; a coil fold is gentler and better for very high hydration, where you lift the middle and let the ends tuck under; a slap and fold on the counter builds strength fast in a slacker dough but throws it around. What they share is the goal: to add tension and organise the gluten, turning a shaggy, formless mass into something smooth, elastic and able to hold a shape. The guide to the folds and when to use each one shows the hand motion and the timing for each.
Shaping: boule and batard
Shaping is the step that decides whether your loaf rises up or spreads out, and it is the one that feels most like a skill because it is one. The job is to build a taut skin of surface tension around the dough so that, as it proofs and bakes, it holds itself tall instead of flowing sideways. A round loaf is a boule; a long oval is a batard; both start from the same pre-shape and a short bench rest that lets the gluten relax before the final shape.
The two mistakes that spoil shaping are opposite: too little tension leaves a slack blob that bakes into a flat pancake, and too much tears the surface and lets the gas escape. Between them is a firm, smooth ball with a tight skin and a sealed seam, set into a floured banneton seam-side up to hold its shape through the cold proof. A wetter dough is harder to shape tight, which is another reason to start nearer 70 percent while you learn the motion. The step-by-step guide to shaping a boule and a batard breaks the motion into stages you can practise.
The cold retard: 12, 24 and 48 hours
Once the loaf is shaped, the best thing you can do with it is put it in the fridge overnight. This cold retard, a long slow proof at refrigerator temperature, does two things at once: it develops a deeper, more complex, more tangy flavour as slow acids build, and it firms the dough so that it is far easier to score and handle cold than warm and slack. The Perfect Loaf's beginner loaf retards for about 16 hours at 38 F (3 C), which is a typical overnight, and the result bakes with better colour and a cleaner cut.
Time in the cold changes the loaf, and you have room to play with it. A 12 hour retard gives a mild tang and a loaf ready for a morning bake; push to 24 and the flavour deepens and the crust caramelises darker; go to 48 and you reach the sour, chewy end of the spectrum, though at some point a very active dough will over-proof even in the cold, so a long retard suits a dough shaped a touch under-fermented. This is also what makes sourdough fit a working life: you can bake fresh bread on a weekday morning because the slow part happened while you slept. The guide comparing 12, 24 and 48 hour cold retards sets out the flavour and timing of each.
Scoring: depth, angle and the ear
Scoring is the single confident cut you make across the top of the loaf just before it goes in the oven, and it is not decoration: it is a controlled weak point that tells the loaf where to burst as it springs in the heat. Skip it and the loaf tears open at random along its side; do it well and it opens along your cut into a raised, curling lip of crust called the ear, the mark of a loaf that was well fermented and well baked. This is why you score cold dough straight from the fridge: it is firm enough to take a clean cut.
The two variables are depth and angle. A single long cut, made with a blade held at roughly a 30 to 45 degree angle to the surface rather than straight down, lifts a flap of dough that the oven spring peels back into an ear; too shallow and it barely opens, too deep and it deflates. Decorative scoring, the wheat sheaves and leaves, is a separate art, but a single clean slash is what actually helps the loaf. The guide to scoring depth, angle and getting an ear covers the blade, the angle and where to place the cut.
Baking in a Dutch oven
The home oven's weakness for bread is steam, or the lack of it. A professional bread oven injects steam in the first minutes so the crust stays soft and stretchy long enough for the loaf to spring fully, then dries out to set a crisp shell. A Dutch oven, a heavy lidded cast-iron pot, fakes this beautifully: the dough's own moisture is trapped under the lid to make its own steam, and you lift the lid partway through to let the crust dry and colour. It is the single most reliable way to get a bakery crust at home, which is why nearly every good recipe calls for one.
The method is consistent across recipes: preheat the pot with the oven, bake covered at around 450 F (232 C) for about 20 minutes so the loaf springs in trapped steam, then uncover and bake roughly 30 minutes more to set and darken the crust (The Perfect Loaf). The loaf is done at an internal temperature of around 208 F (97 C), and it should sound hollow tapped on the base. If you have no Dutch oven, you can approximate the steam with a preheated tray and a pan of water, but a covered pot is worth the outlay. The guide to baking sourdough in a Dutch oven covers the preheat, the timing and the alternatives.
Whole grain sourdough
A wholegrain sourdough, made mostly or entirely with whole wheat, rye or spelt, is a different and more flavourful loaf, and a slightly harder one. Wholegrain flours carry the bran and germ, which means more flavour, more minerals and a faster, livelier fermentation, but the bran is also sharp-edged and cuts through the gluten strands you are trying to build, so a 100 percent wholegrain loaf rises less high and bakes denser than a white one. That is the nature of the bread, not a fault.
The way to bake a good one is to work with those facts rather than against them. Wholegrain flours drink far more water, so the dough runs wetter; the fermentation moves faster, so you watch the dough more closely and often shorten the bulk; and a fully wholegrain loaf benefits from a gentler hand in shaping. Many bakers meet it halfway with a loaf that is 30 to 50 percent wholegrain, which keeps much of the flavour while holding a taller, more open crumb. The guide to whole grain sourdough sets the hydration and the fermentation adjustments.
Gluten-free sourdough
Sourdough without gluten is real, but it is a genuinely different craft rather than the same recipe with swapped flour. Gluten is the elastic network that traps the gas and gives wheat bread its structure, and no gluten-free flour has it, so a gluten-free sourdough leans on a blend of flours and starches plus a binder, usually psyllium husk, to hold the bubbles that fermentation makes. The dough behaves more like a thick batter than a kneadable mass, and you do not fold or shape it the same way.
The fermentation still works, driven by a gluten-free starter fed on a flour like brown rice or buckwheat, and it still brings the tang and the keeping quality that make sourdough worth the trouble. But the handling, the hydration and the bake are their own set of rules, and treating a gluten-free dough like a wheat one is the surest way to a dense, damp brick. The guide to gluten-free sourdough that actually rises sets the flour blend, the psyllium ratio and the method.
Open crumb: what actually controls the holes
The wide, glossy, irregular holes of an open crumb are what many bakers chase, and there is a lot of mythology about how to get them. The honest answer is that no single trick produces an open crumb; it is the sum of several things going right at once. Hydration is the loudest of them, because a wetter dough simply holds bigger bubbles, which is why the 80 percent loaf in the comparison above is so much more open than the 65 percent one. But water alone, without the rest, just gives you a wet, flat loaf.
The others are strength and fermentation. The dough needs enough gluten development, through the folds, to hold large bubbles without collapsing, and it needs to be fermented to just the right point, because an under-fermented dough is too tight to open and an over-fermented one is too weak to hold its shape. Gentle shaping that preserves the gas, a strong flour, and a good bake with real oven spring finish the job. Chasing the open crumb by pouring in water while ignoring fermentation is the classic beginner trap. The guide to what really controls open crumb untangles hydration, strength and fermentation.
Storing and reheating
A sourdough loaf keeps better than most bread because its acidity slows staling, but it still wants to be stored right. For the first day or two, a cut loaf keeps best at room temperature with the cut face down on a board or in a bag or a bread box, never in the fridge, which stales bread faster than the counter does. A whole uncut loaf holds even longer. What you are protecting is the crust and the moisture in the crumb, and both suffer in cold, dry fridge air.
For longer storage, sourdough freezes very well, and freezing is far better than refrigerating: cool the loaf completely, wrap it well, and freeze it whole or pre-sliced. The crust comes back in the oven, not the microwave: a few minutes in a hot oven revives a crisp crust, straight from frozen if you sliced it first, while the microwave turns it soft and leathery. The guide to storing and reheating sourdough covers the counter, the freezer and the oven refresh.
Frequently asked questions
What hydration should sourdough bread be? For most loaves, 70 to 75 percent is the sweet spot: open enough to be worth eating and forgiving enough to handle. A firmer 65 percent dough is easier to shape and slices cleanly, which suits beginners and sandwich loaves; a wetter 80 percent dough gives a more open, glassy crumb but is slack and sticky and needs experienced hands. Start around 72 percent and adjust once you know how a good dough feels.
How long should bulk fermentation take? There is no fixed time, because it depends on temperature and the strength of your starter. A common beginner bulk runs about 4 hours at 74 to 76 F (23 to 24 C) (The Perfect Loaf), but a colder kitchen can take six or seven hours and a warm one three. Judge the dough, not the clock: it should grow by roughly a half to three quarters, dome, show edge bubbles and feel alive.
Do I need a Dutch oven to bake sourdough? No, but it is the single easiest way to a bakery crust at home, because it traps the loaf's own steam for a full oven spring before you uncover it to crisp the crust. Without one, you can approximate steam with a preheated baking tray and a pan of water below, though the crust is usually a touch less dramatic. A heavy lidded pot is worth the outlay if you bake often.
What temperature do you bake sourdough at? Hot. A typical Dutch oven bake runs around 450 F (232 C): covered for about 20 minutes to spring in trapped steam, then uncovered for roughly 30 minutes more to set and colour the crust (The Perfect Loaf). The loaf is done at an internal temperature of about 208 F (97 C) and sounds hollow when tapped on the base.
Why is my sourdough dense and gummy? The usual cause is fermentation, not the recipe. An under-fermented dough bakes tight and heavy because it never built enough gas; an over-fermented one slackens, loses structure and bakes flat and gummy. A weak or under-ripe starter is often behind both. Getting bulk fermentation right, judged by the dough rather than a timer, fixes most dense loaves.
How do I get an open crumb? There is no single trick. An open crumb is hydration, gluten strength and fermentation all landing together: a wetter dough holds bigger bubbles, enough folds give it the strength to keep them, and correct fermentation lets it open without collapsing. Gentle shaping and a strong bake finish it. Adding water while ignoring fermentation is the common way to fail.
Can I make sourdough bread on a weekday? Yes, and that is one of its quiet advantages. The slow part, the overnight cold retard in the fridge, happens while you sleep, so you can shape a loaf one evening and bake it fresh the next morning. Building the schedule around a cold proof is what makes sourdough fit an ordinary week rather than demanding a whole day at home.
Where I checked
Keep reading
 Guide
Guide
Bagel Dough: Why It Is So Firm, and How to Knead It
Bagel dough feels stiff and dry on purpose. Here is why it runs at 50 to 60% water and high protein flour, how to knead it, and the windowpane to aim for.
6 min read Guide
Guide
Bagel Recipe: New York Style, Step by Step
A weight-based New York bagel recipe, step by step: the firm 58% dough, an overnight cold retard, how long to boil, and the oven heat that sets a glossy crust.
6 min read Complete guide
Bagels: The Complete Guide
Make a real bagel at home: the firm 58% dough, why bagels are boiled before baking, New York vs Montreal, sourdough and gluten free, and how to fix flat ones.
18 min read