Complete guide
Roti: The Complete Guide to Soft, Puffy Flatbread
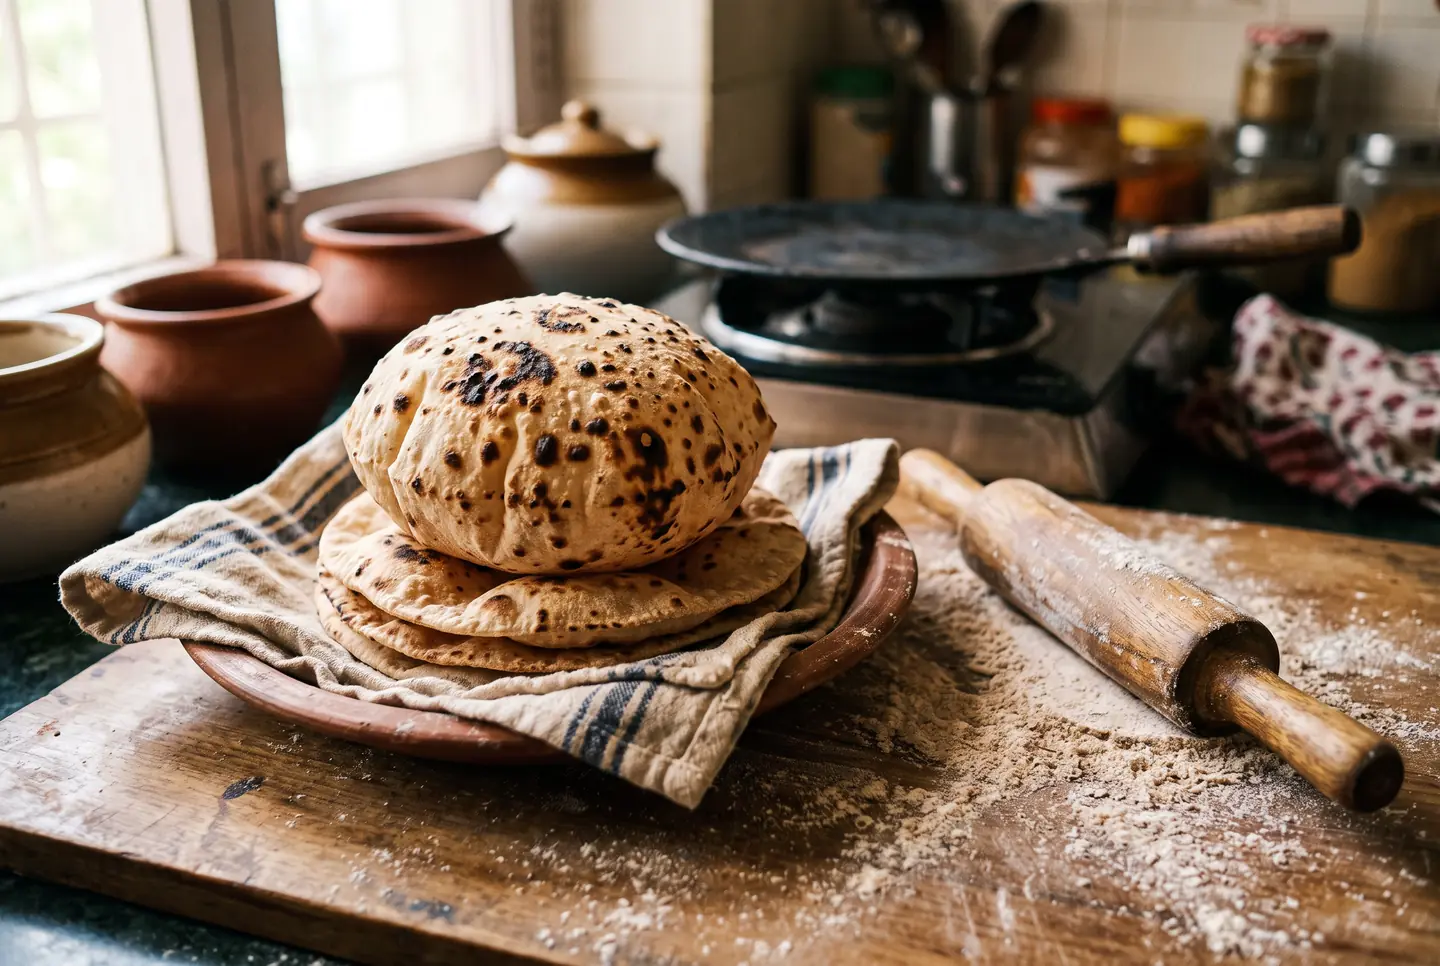
Roti is the everyday bread of the Indian subcontinent, and it is one of the most useful things you can learn to make. Four ingredients, no oven, no yeast, no waiting overnight: just whole-wheat flour, water, a hot pan and about twenty minutes of rest. When it works, a roti comes off the heat soft, foldable and puffed up like a balloon, ready to tear and scoop. When it does not, it comes off tough, pale and flat, and almost everyone who makes their first roti gets the flat, tough one.
The gap between the two is small and it is not luck. It comes down to a handful of decisions: how wet the dough is, how long it rests, how evenly you roll it, and how hot the pan is when the roti lands. Get those right and the puff is close to automatic, because the puff is just steam. Water trapped in the dough flashes to steam on the heat, the top and bottom of the roti set into two thin skins, and the steam blows them apart into a pocket. That is the entire mechanism, and every tip in this guide is really about protecting that burst of steam.
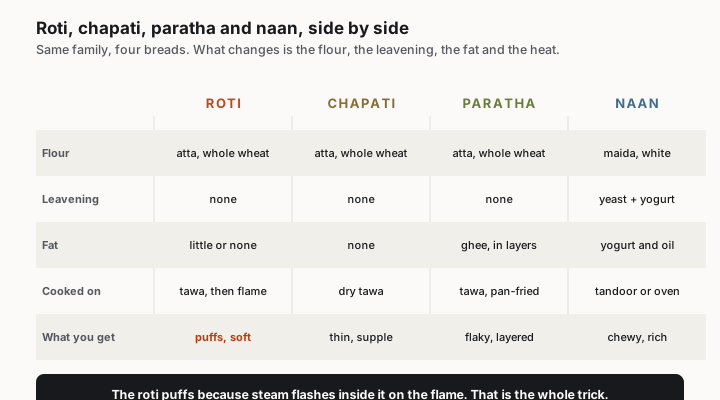
This guide walks the whole thing, from the base recipe and the dough to shaping, resting, cooking and the flame trick, then the sourdough and gluten free versions, the regional family of rotis, the fixes for when it goes wrong, and how to keep and reheat them. Along the way it puts roti next to chapati, paratha and naan, because knowing what makes them different is the fastest way to understand what a roti actually is.
Roti: the base recipe, step by step
A roti is an unleavened round of whole-wheat dough, rolled thin and cooked on a dry griddle until it puffs. There is no yeast and no rise to wait for, so from a standing start you can have hot roti in under an hour. The full method, with the rest and the flame step spelled out, is a step-by-step roti recipe of its own, but here is the whole shape of it in one table.
| Step | What you do | Why |
|---|---|---|
| Mix | Whole-wheat atta, a pinch of salt, water added gradually | Water is what will become steam and puff the roti |
| Knead | Work 4 to 6 minutes into a smooth, soft, non-sticky ball | Kneading builds the gluten that traps the steam |
| Rest | Cover and leave 20 to 30 minutes | Rest relaxes the gluten so it rolls thin without fighting back |
| Divide and roll | Small balls, rolled evenly to about 2 mm thick | Even thickness is what lets the whole round puff |
| Cook | Hot dry tawa, then a few seconds over direct flame | High immediate heat flashes the water to steam |
The one number to fix in your head is the flour to water. A good starting point is water at about 70 to 80 percent of the atta weight (two well-known recipes land at 72 and 81 percent), which is the dough hydration, though some attas drink more. The dough should feel soft, almost tacky, but not stick to your hands. A dry dough is the single most common reason a first roti comes out hard, because a dry dough has little water to turn into steam.
Salt is optional and small, a pinch for flavor. A teaspoon of oil or ghee worked into the dough is also optional; it makes the roti a touch softer and keeps it supple longer, but a plain roti of just flour and water is the traditional and perfectly good default.
The roti dough: hydration and the right feel
The dough is where a roti is won or lost, and the whole game is water. A roti dough should be noticeably wetter and softer than a bread dough, soft enough that it feels almost too sticky when you first bring it together and only firms up into a smooth ball after resting. The full roti dough guide goes deeper on flour and feel, but the principle is simple: more water, within reason, means more steam, means more puff and a softer bread.
Atta is the flour that makes this work. It is stoneground whole-wheat flour, and its fine, even grind and high absorption let it take up a lot of water while staying rollable. A coarser supermarket whole-wheat flour can work, but it drinks less water and tears more easily, so the roti comes out drier and stiffer. If all you have is coarse whole wheat, cut it with a little white flour or add water slowly until the dough turns soft.
| Dough sign | What it means | What to do |
|---|---|---|
| Sticks to hands and bench, will not form a ball | Too wet | Add flour a spoonful at a time |
| Cracks at the edges when you press it | Too dry | Wet your hands and knead the water in |
| Smooth, soft, springs back slowly | Right | Rest it and roll |
| Springs back fast and fights the pin | Underrested | Cover and wait another 10 minutes |
Knead for four to six minutes, until the ball is smooth and gives slightly when pressed. You are not building the strong, elastic gluten of a loaf; you want just enough structure to hold the steam. Then let it rest, which is the next lever and the one people skip.
Shaping roti without losing the round
Rolling a roti into an even circle is the skill that takes the longest to feel natural, and it matters more than it looks, because even thickness is what lets the whole round puff at once. A roti with a thick center and thin edges will puff at the rim and stay raw and flat in the middle. The full guide to shaping roti has the hand movements, but the core habits are short.
Start with a smooth ball, flatten it into a disc, dip both sides lightly in dry flour, and roll from the center outward, turning the round a quarter turn every few strokes. The turning is the trick: it keeps the circle round and the thickness even far better than trying to roll in every direction from a fixed position. Aim for about 2 mm thick and 15 to 18 cm across, roughly the size of a small plate.
Use as little dry flour as you can while still keeping the dough from sticking. Excess flour is a quiet roti killer: the loose flour scorches on the hot pan and, worse, it dries the surface of the roti and works against the puff and the softness. A light dusting, brushed off before cooking, is all you want.
Resting and knowing when to cook
Roti has no yeast, so there is nothing to proof in the sense a bread baker means. What a roti dough needs instead is rest, and the rest does real work: it lets the gluten relax and the flour fully hydrate, so the dough rolls out thin and even without snapping back. Twenty to thirty minutes, covered so it does not dry out, is the sweet spot, and ten minutes is the bare minimum. This is the subject of the full guide to resting roti dough, and the payoff is large for the effort.
You can tell the rest has done its job by feel. Before resting, the dough is springy and fights the rolling pin, pulling back toward the center. After resting, it is relaxed and pliable, and a rolled round holds its shape instead of shrinking. If your rounds keep shrinking back as you roll, the dough has not rested enough; cover it and give it another ten minutes rather than fighting it.
| Rest time | How the dough behaves | Result |
|---|---|---|
| No rest | Springs back hard, tears, rolls unevenly | Tough, patchy roti |
| 10 minutes | Rolls, with some resistance | Acceptable in a hurry |
| 20 to 30 minutes | Rolls thin and smooth, holds its shape | Soft, even, puffs well |
| Several hours in the fridge | Very relaxed, may need a moment to warm up | Fine, bring to room temperature first |
A rested dough also keeps. You can make it ahead, wrap it well and refrigerate it for a day or two, then let it come back to room temperature before rolling. Cold dough rolls stiff and puffs poorly, so give it that warm-up.
Cooking roti: the pan, the heat and the flame
Heat is the last lever and the one that turns a rolled round into a puffed roti. A roti is cooked on a tawa, a flat or slightly concave griddle, but any heavy flat pan works. The pan has to be properly hot before the first roti lands, because the puff depends on the water flashing to steam fast; a cool pan just dries the roti out slowly and leaves it flat and leathery. The full guide to cooking roti covers pans and timing, and the sequence below is the one that works at home.
| Stage | What you do | What you see |
|---|---|---|
| Preheat | Heat a dry tawa over medium-high until a drop of water skips | The pan is ready, not smoking |
| First side | Lay the roti down, wait 15 to 30 seconds | The surface loses its wet sheen, small bubbles start |
| Second side | Flip, cook until pale brown specks appear | It firms and begins to lift in spots |
| The puff | Flip again, press gently or move over direct flame | It balloons into a full round in seconds |
The puff step is the famous one. If you cook on gas, you can slide the half-cooked roti straight onto the open flame for a few seconds, where the direct heat drives the steam hard and inflates it into a sphere; a roti puffed this way over the flame is called a phulka. If you cook on an electric or induction hob, you get the same result by pressing gently around the roti with a folded cloth, which traps the steam and forces it to lift the bread. Either way, the moment it puffs it is done, so pull it before it dries.
The heat has to stay high but not scorching. Too low and the roti never puffs and turns to leather; too high and it burns in dark patches before the inside sets. Medium-high, adjusted as you go, is the target, and the pale brown specks are your color cue, not deep charring.
Roti with a sourdough starter
If you keep a sourdough starter, roti is an easy and rewarding thing to make with it, and it is one of the better homes for a bit of leftover discard. Classic roti is unleavened, so you are not doing this for a rise; you are doing it for flavor and for a slightly more tender, less brittle bread. The full sourdough roti guide has the timing, and the short version is that a spoonful of starter and a short rest change the character without changing the method.
There are two ways to go about it. The quick way is to add a couple of tablespoons of active starter or discard to the dough for a mild tang, rest it the usual twenty to thirty minutes, and cook it exactly like a normal roti. The slower way is to build the dough with more starter and let it ferment for a few hours or overnight in the fridge, which deepens the sour flavor and makes the dough especially soft and easy to roll. Everything at the pan stays the same: hot tawa, even roll, and the flame or the press for the puff.
Gluten free roti that works
Gluten is what holds the steam in a wheat roti, so a gluten free roti has to solve that problem a different way, and it can be done well. The trick is to lean on flours and binders that hold together without wheat gluten, and to accept that a gluten free roti is a little more fragile to handle. A full gluten free roti guide walks through the flour blends, and the principles below get you most of the way.
The most authentic route is to skip wheat entirely and use a flour that is naturally suited to flatbread. Makki roti, made from corn flour, and jowar or bajra roti, made from sorghum or pearl millet, are traditional gluten free rotis from India that were never made with wheat in the first place. They are patted out by hand or pressed rather than rolled thin, because without gluten they crack at a thin roll, and they are wonderful with the right dishes.
| Flour or blend | Binder needed | Notes |
|---|---|---|
| Corn flour (makki) | Hot water helps it bind | Traditional, patted by hand, best eaten hot |
| Sorghum (jowar) or millet (bajra) | Hot water, careful handling | Traditional, nutty, a little crumbly |
| Gluten free blend with xanthan | Xanthan in the blend | Rolls more like wheat, most forgiving |
| Cassava or a starch-heavy blend | Sometimes psyllium | Very pliable, closest to a soft wheat roti |
For a roti that rolls and folds like the wheat version, a store-bought gluten free flour blend that already contains xanthan gum is the most forgiving choice; add psyllium husk if the blend has none, since psyllium builds the stretchy structure that lets a dough hold steam. Keep the dough a touch wetter than you would a wheat one, and handle it gently.
The regional types of roti
Roti is not one bread but a whole family, and the word covers a wide range across the countries where it is eaten. Knowing the members is genuinely useful, because it tells you what to expect when you see the name on a menu. The full guide to the types of roti maps the family in detail, and the table below covers the ones you are most likely to meet.
| Type | Where | What sets it apart |
|---|---|---|
| Chapati | India, East Africa | The everyday roti, thin and cooked on a dry tawa |
| Phulka | North India | A chapati puffed directly over the flame |
| Tandoori roti | India, Pakistan | Thicker, baked against the wall of a tandoor |
| Rumali roti | North India | Very thin and large, folded like a handkerchief |
| Makki roti | Punjab | Corn-flour roti, patted by hand, gluten free |
| Roti canai | Malaysia, Indonesia | Flaky, stretched and folded, closer to a paratha |
| Sada roti | Trinidad, Caribbean | Plain, thick, a staple of the Caribbean-Indian table |
| Dhalpuri | Trinidad, Caribbean | Stuffed with seasoned ground split peas |
The important line to draw is between the plain, unleavened, whole-wheat rotis like chapati and phulka, which are the heart of the word, and the richer or stuffed cousins like roti canai and dhalpuri, which are the same tradition grown up and dressed for a bigger occasion.
Where roti goes wrong, and how to fix it
Almost every roti problem is one of the same handful, and each traces back to one of the four levers: the dough, the roll, the rest or the heat. Once you can name which lever failed, the fix is obvious. The full roti troubleshooting guide covers every case, and this table catches the common ones.
| Symptom | Main cause | The fix |
|---|---|---|
| Will not puff | Pan not hot enough, or rolled unevenly | Get the pan hotter, roll to even thickness |
| Hard and tough | Dough too dry, or overcooked | Wetter dough, pull it the moment it puffs |
| Raw, doughy middle | Rolled too thick, or heat too low | Roll thinner, raise the heat |
| Burnt spots, still pale | Heat too high, too much dry flour | Lower the heat, brush off loose flour |
| Cracks and tears when rolling | Underkneaded or underrested | Knead smooth, rest longer |
| Stiff and leathery on cooling | Not enough water, or left uncovered | More water in the dough, keep them wrapped |
The single most common complaint is a roti that refuses to puff, and it is nearly always one of two things: the pan was not hot enough, or the round was rolled unevenly with a thick middle. Fix the heat first, because it is the faster of the two to correct, then work on getting the roll even.
How to store roti and keep it soft
Roti is best straight off the heat, but it keeps well enough that making a batch ahead is worth it, as long as you protect it from drying out. The enemy is air, which turns a soft roti stiff and leathery within minutes if you leave it uncovered. The full guide to storing roti has the details, and the rule is simple: keep the steam in.
| Storage | How | How long |
|---|---|---|
| Hot, for the meal | Stack in a cloth-lined insulated container | A few hours, stays soft |
| Fridge | Cooled, wrapped tight or in a sealed bag | 2 to 3 days |
| Freezer | Stacked with parchment between, in a bag | 1 to 2 months |
| Reheat | Warm on a dry pan or briefly over flame, sprinkle of water | Back to soft |
The moment they come off the pan, stack your rotis and wrap them in a clean cloth, or tuck them into a cloth-lined pot with the lid on. Trapping their own steam is what keeps them pliable. To reheat, warm them on a dry pan for a few seconds a side; a very light flick of water or a covered pan helps bring back the softness. Avoid a long spell in the microwave uncovered, which steams them briefly soft and then leaves them rubbery.
The history of roti: where it came from
Roti is old, and its name is older. The word comes from the Sanskrit rotika, meaning simply bread, and the flatbread it describes has been the daily bread of the Indian subcontinent for a very long time. It is unleavened by tradition, cooked on a hot surface rather than baked in an oven, which is exactly what you would expect of a bread that predates and lives alongside the great tandoor and clay-oven traditions rather than depending on them. The full history of roti follows the story further.
What makes roti remarkable is how far it traveled. Where people from the subcontinent went, roti went with them, and it put down roots. In the Caribbean, especially Trinidad, roti became a cuisine of its own, with the wrap roti sold as street food said to have taken its modern form in the mid-1940s in the south of the island. In Malaysia and Indonesia it became the flaky roti canai. In South Africa, Mauritius, Fiji and East Africa it settled into local kitchens. A single humble flatbread is now genuinely a bread of the world, and the version you make at home is the same idea that fed all of them.
What to serve with roti and how to build a plate
A roti is a tool as much as a bread: it is the spoon, the scoop and the wrap of the meal, and it is built to be eaten with something rather than on its own. Knowing how to pair it turns a stack of plain rotis into dinner. The full guide to serving roti has more combinations, and the logic below covers most of them.
The classic move is to tear a piece, use it to pinch up a bite of a wet dish, and eat the two together. That makes roti the natural partner for anything with sauce: a dal, a vegetable curry, a rich meat curry, a bowl of yogurt or a pile of spiced greens. A little ghee brushed on a hot roti, or a smear of pickle, is a meal on a busy night. And rolled around a filling, a roti becomes a handheld wrap, which is exactly the leap the Caribbean wrap roti made.
| Pair roti with | Why it works |
|---|---|
| Dal or lentils | The bread scoops the soft, wet lentils cleanly |
| Vegetable or meat curry | It soaks up sauce and cools the spice |
| Yogurt or raita | Cool and tangy against a warm, plain bread |
| Ghee and pickle | Fast, rich and salty, a meal in two minutes |
| A rolled filling | Turns the roti into a portable wrap |
The one thing not to do is treat roti like a side you eat separately. It is designed to be part of each bite, and it is at its best warm, soft and torn by hand at the table.
Frequently asked questions
What is roti made of? Roti is made of whole-wheat flour, water and usually a little salt, with an optional touch of oil or ghee for softness. The flour is traditionally atta, a fine stoneground whole-wheat flour that absorbs a lot of water and rolls thin, which is what gives roti its soft, foldable texture.
Why is my roti not puffing? Almost always because the pan is not hot enough or the roti is rolled unevenly. The puff is steam flashing inside the bread, so it needs high, immediate heat and an even thickness to lift the whole round at once. Get the tawa properly hot, roll to an even 2 mm, and finish over a direct flame or under a gentle press.
What is the difference between roti and chapati? They are essentially the same bread. Chapati is the common name for the thin, everyday roti cooked on a dry tawa, and phulka is a chapati puffed over an open flame. Roti is the broader word that also covers thicker and regional versions, so every chapati is a roti, but not every roti is a chapati.
How is roti different from naan? Roti is unleavened and made from whole-wheat atta, cooked on a dry griddle. Naan is leavened with yeast and yogurt, made from white flour (maida), and baked against the hot wall of a tandoor. That makes naan softer, thicker and richer, and roti lighter and more of an everyday bread.
What is the difference between roti and paratha? Both start from the same whole-wheat dough, but a paratha has ghee or oil folded into it in layers and is pan-fried, which makes it flaky, rich and crisp. A roti is plain and cooked dry, so it is lighter and softer. A paratha is roti dressed up with fat and folding.
Can I make roti without atta flour? Yes, though the texture changes. A regular whole-wheat flour works but drinks less water and can come out stiffer, so add water slowly and keep the dough soft. For gluten free roti, corn, sorghum or millet flours are traditional, and a gluten free blend with xanthan or psyllium rolls closest to the wheat version.
How do I keep roti soft after cooking? Stack them the moment they come off the pan and wrap them in a clean cloth or keep them in a cloth-lined covered pot, which traps their steam and keeps them pliable. Stored in the fridge or freezer, wrap them tightly, and reheat on a dry pan with a light flick of water to bring the softness back.
Keep the dough soft, roll it even, and cook it hotter than feels comfortable. The puff will follow, and once it does the first time, your hands remember it.
Where I checked
Keep reading
 Guide
Bagel Dough: Why It Is So Firm, and How to Knead It
Bagel dough feels stiff and dry on purpose. Here is why it runs at 50 to 60% water and high protein flour, how to knead it, and the windowpane to aim for.
6 min read Guide
Bagel Recipe: New York Style, Step by Step
A weight-based New York bagel recipe, step by step: the firm 58% dough, an overnight cold retard, how long to boil, and the oven heat that sets a glossy crust.
6 min read Complete guide
Bagels: The Complete Guide
Make a real bagel at home: the firm 58% dough, why bagels are boiled before baking, New York vs Montreal, sourdough and gluten free, and how to fix flat ones.
18 min read