Guide
How to Dimple Focaccia: When to Press and How Deep
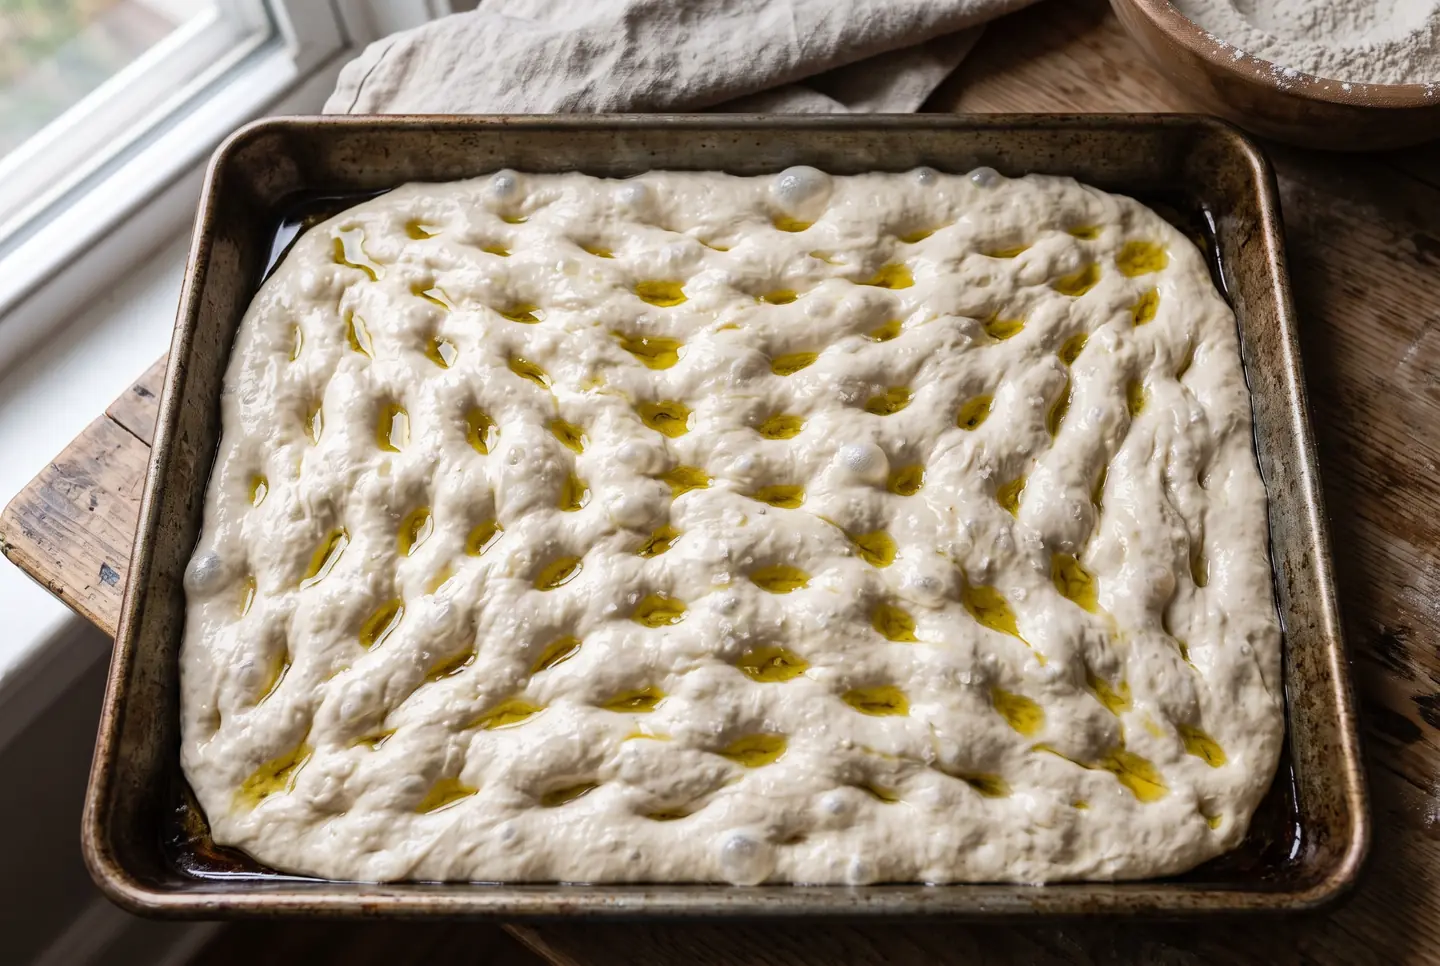
Dimple focaccia at the very end, after the dough has done its final rise in the oiled pan and just before it goes into the oven. Oil your fingers, spread them, and press straight down to the bottom of the pan, leaving a grid of deep wells across the whole surface. That is the short answer; the reason the timing and the depth matter is worth a few minutes, because the dimples are the single feature that separates focaccia from flatbread.
The wells are not there to look pretty. Each dimple is a small reservoir that holds the olive oil and the salamoia brine you pour over the top, and because oil carries far more heat than air, those pockets fry the dough around them into crisp golden craters while the raised ridges between stay soft. That contrast, a crisp edge and a tender crumb in the same bite, is most of what people love about a good focaccia. This page stays on the pressing itself; for the whole method it sits inside, the complete focaccia guide is the place to start, and it follows straight on from the focaccia recipe and the salamoia brine.
Dimple last, not first
The most common mistake is dimpling too early, when the dough is still slack from mixing. Press it then and the wells close up again as the dough proofs, and you end up with a flat top and no reservoirs. The dimples have to be the last thing you do to the dough before the salamoia and the oven.
The sequence that works, drawn from the King Arthur no-knead focaccia and the Serious Eats method:
| Step | What happens |
|---|---|
| Mix and bulk ferment | Dough builds gas and strength, off to the side |
| Transfer to an oiled pan | Dough relaxes and spreads to fill the corners |
| Final proof in the pan | Dough puffs, usually 30 to 60 minutes at room temperature, longer if cold |
| Dimple | Press to the bottom, right before baking |
| Salamoia and bake | Brine fills the wells, oven sets them |
If the dough will not stretch to the corners of the pan after the transfer, it is not slack enough or it needs more rest: cover it and wait, do not force it, or it tears and springs back.
How deep, and how hard
Press all the way down until your fingertips touch the bottom of the pan. Shallow dimples fade during the bake; deep ones survive and keep their pools of oil. Keep your fingers spread so you make a whole field of wells in a few passes rather than one at a time, and keep them oiled so the dough releases instead of dragging up with your hand.
The dough should feel alive under your fingers: it will resist a little, dimple, and hold the shape. If it deflates into a sad flat sheet, it was over-proofed and lost its gas; if it fights back hard and fills the wells in seconds, it needs a few more minutes of rest before you try again. Reading that resistance is the whole skill, and it comes quickly with practice.
A light touch on quantity: the dimples want to cover the surface edge to edge, not just the middle. The corners and edges are where a home focaccia most often bakes up hard and pale, so give them dimples too, and make sure the oil reaches them.
The oil and the brine go in the wells
Dimpling and the salamoia are one move, not two. Right after you press the wells, pour or brush the brine, a simple mix of water and olive oil in roughly equal parts, over the top so it settles into the dimples. The traditional focaccia at Italian Recipe Book uses that water-and-oil brine as the finish, and it is what floods the wells so they fry rather than dry.
Flaky salt goes on after the brine, not before, so it sits on top and stays crunchy instead of dissolving. Any toppings that are meant to be pressed in, like halved cherry tomatoes or rosemary, go in at this same moment, tucked into the wells so they anchor and do not slide off; the guide to focaccia toppings sorts out which ones go on now and which wait until part-way through the bake.
Common dimpling problems
A few things go wrong often enough to name:
- Wells disappear in the oven. They were too shallow, or the dough was under-proofed and sprang back. Press deeper next time, to the bottom.
- Dough tears when you press. It is under-rested or too cold. Let it warm and relax, then dimple gently.
- Top stays pale and flat. Not enough oil in the wells. The dimples exist to hold oil; if they are dry, they cannot fry the crust.
- Fingers drag the dough up. Oil your hands. Dry fingers stick and pull the surface apart.
Get the timing and the depth right and the rest of the bake is forgiving. The dimples are the small, late move that decides whether you pull out focaccia or a plain oiled slab.
Frequently asked questions
When exactly should I dimple focaccia? At the very end, after the final proof in the pan and right before the salamoia and the oven. Dimpling earlier lets the wells close as the dough continues to rise.
How deep should the dimples be? All the way to the bottom of the pan. Shallow dimples fade during baking; deep ones hold their pools of oil and keep their shape.
Why does my focaccia lose its dimples in the oven? Either the dimples were too shallow or the dough was under-proofed and had too much spring left, so it filled the wells back in as it baked. Press deeper, and let the dough finish proofing before you dimple.
Do I oil my fingers before dimpling? Yes. Oiled fingers release cleanly and press deeper; dry fingers stick and tear the surface as you pull them out.
What goes in the dimples? The salamoia brine (water and olive oil in roughly equal parts) fills them so the wells fry the crust golden. Pressed-in toppings and flaky salt go on at the same moment, over the brine.
Where I checked
Keep reading
 Guide
Guide
Bagel Dough: Why It Is So Firm, and How to Knead It
Bagel dough feels stiff and dry on purpose. Here is why it runs at 50 to 60% water and high protein flour, how to knead it, and the windowpane to aim for.
6 min read Guide
Guide
Bagel Recipe: New York Style, Step by Step
A weight-based New York bagel recipe, step by step: the firm 58% dough, an overnight cold retard, how long to boil, and the oven heat that sets a glossy crust.
6 min read Complete guide
Bagels: The Complete Guide
Make a real bagel at home: the firm 58% dough, why bagels are boiled before baking, New York vs Montreal, sourdough and gluten free, and how to fix flat ones.
18 min read